
Adjust campaign sending schedule
Overview
Control when your cold email campaigns send messages by adjusting daily time windows, active days, time zones, and campaign start/end dates. Setting the right schedule ensures your emails arrive during business hours in your prospects' local time zones and helps you stay within platform sending limits.
You can configure global defaults for all campaigns or customize schedules for individual campaigns to match specific outreach strategies.
Set global sending defaults
Global settings apply to all new campaigns automatically. Existing campaigns retain their current schedules unless you update them individually.
Navigate to Dashboard > Settings > Cold Email Agent
Locate the Campaign Settings card
Configure your sending window:
From time: Select the earliest time to start sending (e.g., 9:00 AM)
To time: Select the latest time to send (e.g., 6:00 PM)
Time zone: Choose the time zone that matches your leads' geographic location
Select active days by toggling Monday through Sunday (blue = active, gray = inactive)
Click Save Settings to apply changes
Default settings work for most campaigns: Monday-Friday, 9:00 AM to 6:00 PM in your primary market's time zone. Adjust only if you're targeting specific regions or industries.
Customize schedule for a specific campaign
Override global settings when a campaign targets a different region, requires specific timing, or needs custom duration.
Go to Campaigns and select your campaign from the list
Click the Options tab
Scroll to the Campaign Settings section
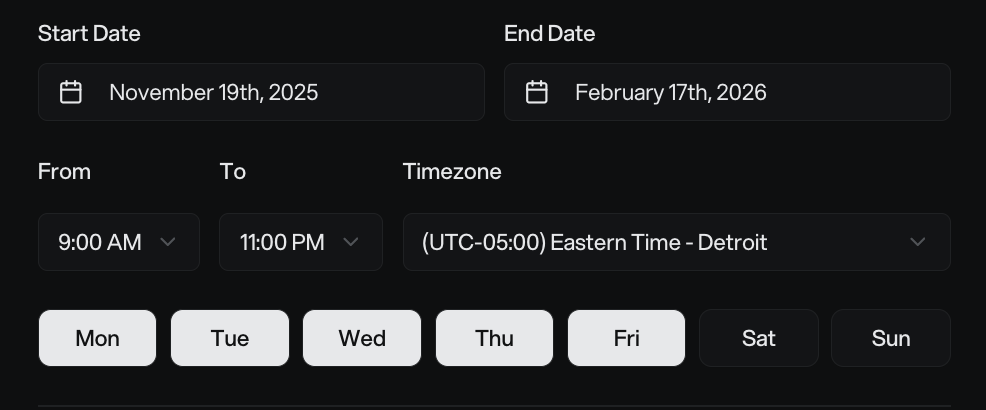
Adjust the schedule:
Start date: When the campaign begins sending (defaults to today)
End date: When the campaign stops (must be after start date)
From/To times: Daily sending window in 30-minute increments
Time zone: Select from ~70 available options
Active days: Toggle specific weekdays
Click Save Settings at the bottom of the page
The platform automatically pauses sending outside your configured time windows and inactive days. Emails resume when the next scheduled window opens.
Choose the right time zone
Always set your time zone to match where your leads are located, not your own location. Emails sent during recipients' business hours receive significantly higher engagement.
Common time zone scenarios:
US East Coast leads: Select "(UTC-05:00) Eastern Time - Detroit" or similar
US West Coast leads: Select "(UTC-08:00) Pacific Time - Los Angeles"
Multi-region campaigns: Create separate campaigns for each major time zone (e.g., one for EST, one for PST)
International leads: Choose the time zone for your largest prospect segment
Sending emails at 2:00 AM in a prospect's local time zone signals automated bulk sending and increases spam risk. Time zone alignment is critical for deliverability.
Best practices for sending times
Optimal days of the week
Industry data shows mid-week days perform best for B2B cold emails:
Tuesday, Wednesday, Thursday: Highest open rates and reply rates (19-22% open rates)
Monday: Viable for replies despite inbox congestion
Friday: Lower engagement as prospects wrap up their week
Saturday/Sunday: Avoid for B2B — minimal engagement and higher spam perception
Stick to Monday-Friday unless you have data showing your specific audience engages on weekends.
Best times of day
Send during these windows in your prospect's local time zone for maximum visibility:
8:00 AM - 11:00 AM: Primary window when prospects check email before meetings start
1:00 PM - 3:00 PM: Secondary window during early afternoon lulls
Evening (8:00 PM - 11:00 PM): Some data shows higher reply rates for B2B cold outreach, though lower open rates
Avoid sending before 6:00 AM or after 11:00 PM in the recipient's time zone.
Test your timing. While mid-week mornings work for most audiences, run A/B tests by creating duplicate campaigns with different schedules to find what resonates with your specific prospects.
Campaign duration and sending limits
When setting your start and end dates, ensure your campaign has enough time to send to all leads without hitting platform sending limits. The system enforces sending quotas to maintain deliverability and sender reputation.
Planning your timeline:
Check your workspace lead limit in the campaign settings area
Estimate daily send capacity based on your active email accounts
Set an end date that gives the campaign sufficient days to complete, accounting for weekends and inactive days
If your campaign includes 5,000 leads and daily limits allow 200 sends per day, you'll need approximately 25 active sending days. Factor in follow-up sequences when calculating duration.
For specific daily sending quotas, check your email provider's dashboard (e.g., Instantly) or contact support. Platform limits vary based on your plan, account warm-up status, and provider settings.
Troubleshoot scheduling issues
Campaign isn't sending emails
Check these common causes:
Outside time window: Verify current time falls within your From/To schedule in the campaign's time zone
Inactive day: Ensure today's day of the week is toggled on (blue)
Campaign status: Confirm campaign is "Active" not "Paused" or "Draft" — use Resume to restart paused campaigns
No active email accounts: Check that at least one connected email account shows a green status indicator
Past end date: Campaign automatically stops after the configured end date
Schedule settings won't save
If changes don't persist after clicking Save Settings:
Ensure end date is the same as or later than start date (validation blocks invalid ranges)
Refresh the page and try again if the form appears glitchy or doesn't load completely
Check that you have adequate permissions for the workspace
Tip: Scheduling around holidays
Manually pause campaigns during major holidays or company shutdown periods. The platform doesn't automatically detect holidays, so plan ahead:
Go to your campaign and click Pause before the holiday
Resume the campaign after the break by clicking Resume
Alternatively, set your end date before the holiday and create a new campaign to start afterward.
Prerequisites
Before adjusting campaign schedules, ensure you have:
Pro or higher plan: Cold Email Agent requires a paid subscription
Connected email provider: Link your Instantly account via Settings > Cold Email Agent
Active email account: At least one connected inbox with a green status indicator
Related articles
How to Create a New Cold Email Campaign — Set up your first campaign and configure initial schedules
Cold Email Agent Overview — Monitor campaign performance and sending metrics
Understanding Email Variants and Sequences — Plan follow-up timing alongside your sending schedule